Woodworking Class - Proper Power Tool Use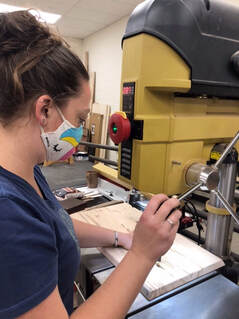 Good Morning class! Here is your lumber and some giant power tools that could all easily remove your fingers and a lecture on the myriad of ways that you could do that. Oh gee! Good thing I wasn’t already nervous about trying my hand at building custom wood furniture. Only joking...sort of...there really are over a hundred careless things that you could do that would result in the loss of finger or at least a really big boo boo. Good news is that I’m not undertaking this unsupervised, and Brian is there to tell us all exactly how not to do that. That’s what the first half of day one of Woodworking 1 class was all about — respecting the tools you use to build furniture. Brian talked about the table saw, bandsaw. and yes, no joke, how not to lose any digits or appendages while using said giant torture devices. Not to sound alarmist. As Brian repeatedly said, it pretty much boils down to respecting the tool and not being a careless ninnyhammer. Okay, he never said ninnyhammer; I did. But, I really just felt it was implied, and I really did mentally entitle this portion of class “101 Ways to Lose Your Fingers.” Brian was really thorough in going through all of the things not to do. Things not to do when using the table saw and bandsaw:
You know, standard stuff like that. Looking around at the faces of my classmates, 2 of the 3 definitely looked pretty spooked. When it came time to use the table saw, I was definitely right in my observation; they approached that saw the way I would approach a spider — like it might suddenly latch itself onto my face just because I am in its general vicinity. But Brian was there every step of the way, and once they actually used the saw, they visibly became more comfortable. As for me, the table saw wasn’t an issue. Even if it was, this model, a SawStop in case you were wondering, comes equipped with its very own instant braking system. Not saying that you still couldn’t get hurt, but I’m not kidding when I say it stops instantly if anything conductive (like your hand) gets on the blade. (Watch a really cool video from YouTube here.) Anyway, I guess I just had to be weird and be nervous about using a bandsaw. But you tell me… When you have a piece of equipment that can cut through a 16” thick piece of wood like butter, what’s not to be scared of? It is definitely a piece of equipment to be cautious with. But as with my classmates and the table saw, once I had used it the first time, it was pretty easy to get comfortable with. Comfortable, but no less vigilant. I like having all of my fingers. Crafting Fine Furniture: Preparing to PrepareI am going to be incredibly honest; I really was nervous going into class. (And not about using the power tools.) I am not one to go wandering around my local hardware stores looking at tools or dreaming up the things I could build if I had just the right router. I leave that to my husband. I feel accomplished when I get a piece of IKEA furniture put together with no issues. On the list of things I am, if not good at, at least capable of, woodworking and building my own furniture doesn’t even register. I mean I have “made” things...in a very not-fine-furnishing kind of way. We are talking 2x4’s, plywood, and a thick layer of paint. Usually functional, definitely not art, and never using any tool bigger than a standard chop saw. I really felt like I wasn’t capable of truly making furniture, let alone wood furniture anywhere close to as beautiful as what Brian does. In point of fact, I felt incredibly inept. I really didn’t see how taking one class could change that, but I wanted to try. I am incredibly happy to admit that I couldn’t have been more wrong — one class made an incredible difference, and I can make furniture. Once we had gotten through the “don’t lose your fingers” lecture. It didn’t take me long to realize that Brian has gotten his teaching method down to an art. (Not surprising, he is a furniture artist.) Not only does he explain what you need to do, he tells you why you need to do it that way, the point that I find most important to understanding things. He also has the perfect balance of necessary and informative lecturing with shown demonstrations and then, obviously, the hands-on work. 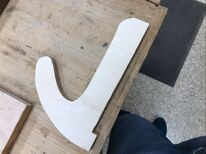 First hands-on project? Use the Laguna bandsaw to cut out a push stick. For those of you not in the know, a push stick is simply a small piece of shaped plywood designed to keep your fingers away from the table saw blade when making really narrow cuts. Please feel free to ooh and ahh over the glorious push stick that I fashioned. Organizing Our LumberNot content to let me revel in my “conquering” of the bandsaw, Brian quickly moved the class on to the next task — organizing our lumber into two legs and a top. Why? So that we could use the table saw to get the parallel, straight edges needed in order to join our boards together to make 3 pieces big enough to create the end table. Luckily, Brian had given us all one side of each board that was already a straight cut. Unluckily, I would pick my not straight cut edges to be the ones that will join together. Not a big deal in the end, I just had a little more initial clean up work on the table saw to get boards with parallel edges. But guess what? I can’t just cut my boards then glue them together. Nope, apparently all table saws (all saws for that matter), no matter how nice, leave behind slight wavy patterns along a cut because of the spacing between the blade’s teeth. I had never even thought of that. How do you clean that up though? With a hand plane, henceforth to be called the bane of my existence. Hand Planing in Woodworking ClassTo say that hand planing is not my thing would be to understate matters. No matter how hard I tried to correct myself and adjust my movements accordingly, I still pushed harder on one side of the plane than the other. I also really liked dropping down to the right on the end of my planing stroke. Gah! Argh! Sigh. Frustration definitely got the better of me here. And of course, I couldn’t just call it “good enough” and walk away. That edge has to be as close to a perfectly flat surface as possible when joining two pieces of wood together to avoid gapping. But I stuck with it and with some help from Brian and eventually a jointer, I got all of my joining board edges beautifully flat and ready for glue. Biscuit Joining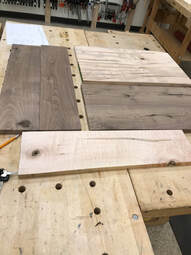 I really feel like I found my calling in this next step. Biscuit joining is my jam. Easy to use and pretty much foolproof as long as you mark your boards correctly, I really would like to just “play” with a biscuit joiner for a while. Not knocking the big tools, but this guy is way more my speed. Plus, there is something super satisfying about cutting out the little divots for the biscuits to go into. But when learning to build a table in 3 days, there is no time for excess biscuitry. Glue Ups in Woodworking Class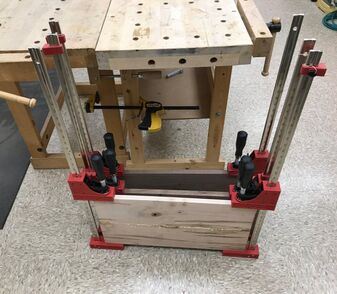 From biscuits, the class went straight in to glue ups. This involves Titebond wood glue and strategically placed clamps. Then it was time for me to literally sit around and watch glue dry. This didn’t take nearly as long as you would think. 15 minutes later, the glue was dry enough to scrape off, and day one of Woodworking 1 was done.
I couldn’t believe how fast eight hours flew by. I swear I had just stepped into class, nervous about my skill level, and here I was leaving, actually confident in my capabilities and ready to tackle the next phase: Building My Custom End Table. Stay tuned for my next installment covering days 2 and 3 in Woodworking 1. Comments are closed.
|
Email [email protected] | Company Brian Hubel | Address Colorado Springs | Phone 719.667-0577 | Serving Worldwide
This website and its content is copyright of Brian Hubel, Hubel Handcrafted Interiors Inc., and my not be reproduced, sold, or claimed without written permission.
Copyright ©1998-2021 All Rights Reserved